Setup instructions
This documents contains the guide for setting up ThingsBoard web interface connecting to Paystack and database backend
Introduction
This document provides details on how to integrate ThingsBoard API to developers metering application to view historic energy and to implement the designed web for top-up via Paystack, checking meter connectivity status, STS-token generation, set tariff per kWh and details to database.
Definitions
Developer: is referred to in this document as the web developer or meter manufacturing entity.
User: is referred to in this document as the metering customer.
Screen Recording Demo
ThingsBoard API integration
ThingsBoard is an open-source server-side platform that allows you to monitor and control IOT devices. It is free for both personal and commercial use and can be deployed anywhere. Steps to set up a ThingsBoard page is highlighted below:
Step 1: Signing up for ThingsBoard
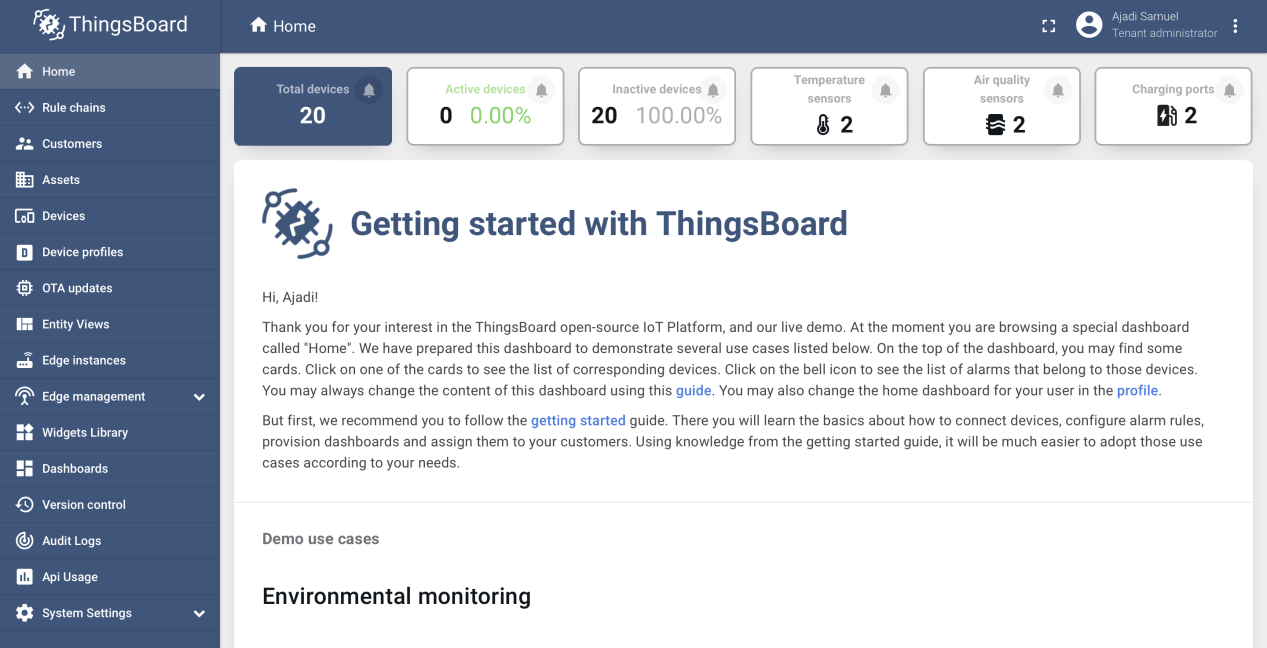
The first step requires first time developer to setup a ThingsBoard account by signing up using the https://demo.thingsboard.io/login link, once this is done, the developer can sign in using the login details provided while signing up.
If the developer is on the right page, the developer should end up with the page highlighted below.
Step 2: Setting up ThingsBoard page
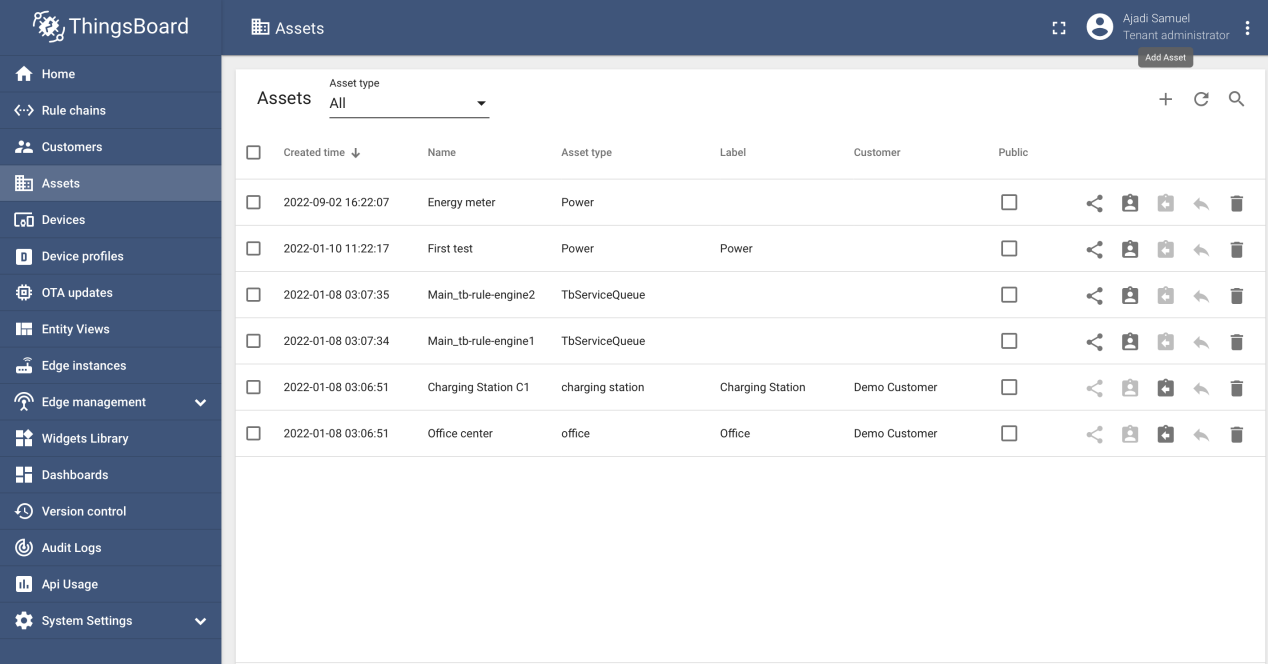
Developer needs to setup the ThingsBoard to view meter parameters such as energy and top-up balance. To do this, developer need to navigate to the asset's icon on the left side of the web page, click on it and locate the add asset button on the top right corner of the page. A sample of add icon picture and assets page is shown below.
Step 3: Add Asset
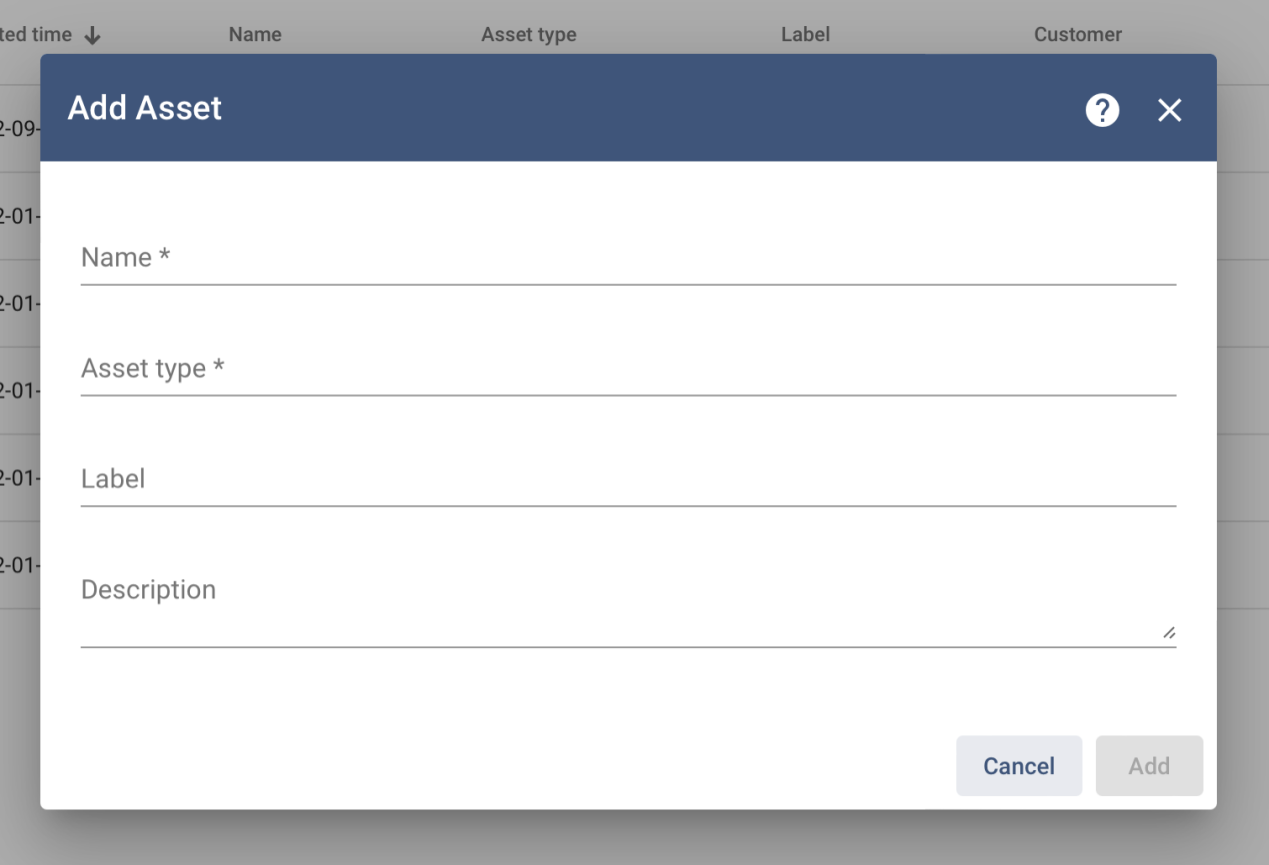
Once developer clicks on "Add Assets", user will end up with the page shown below. Developer can proceed to fill Name, Assets type, Label, Customer. However, the most important is name and asset type. Once the information is filled, user can proceed to click the add button and the name will show up in the assets page.
Step 4: Add Devices
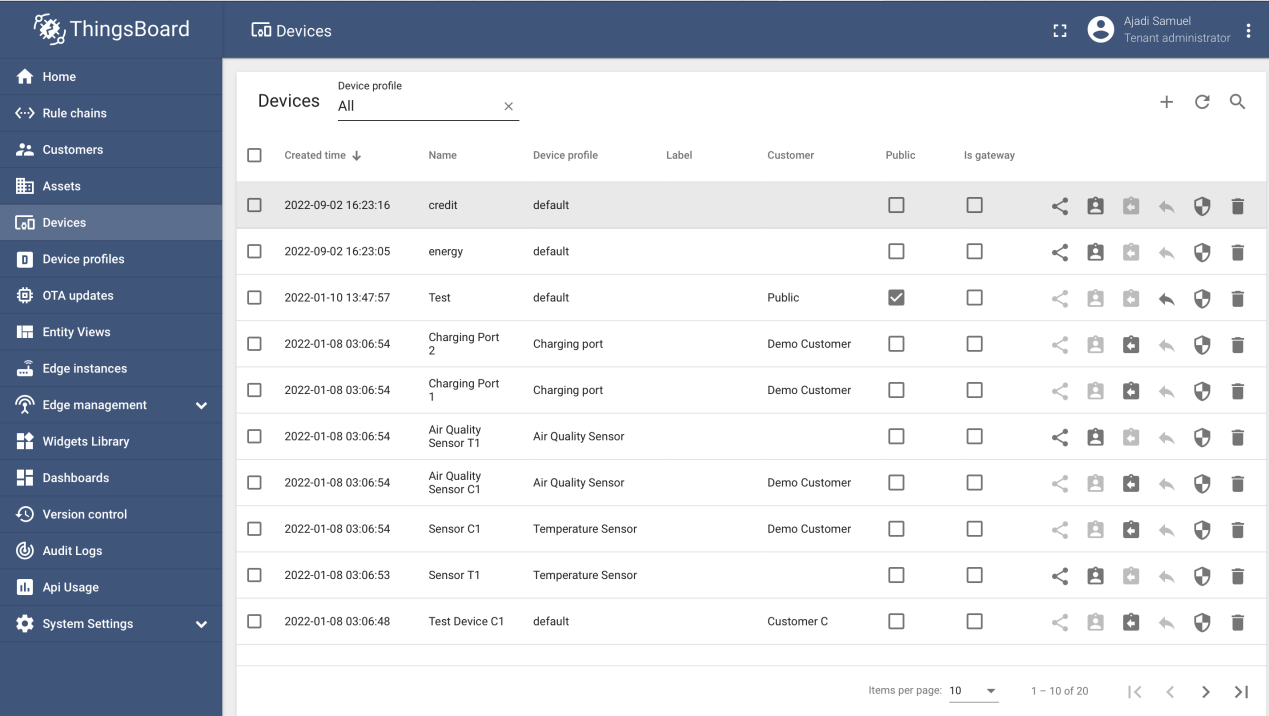
Once developer is done setting up the assets, user can proceed to click on the devices button and add devices. Image of the add process is shown below, in our case we added "credit" and "energy".
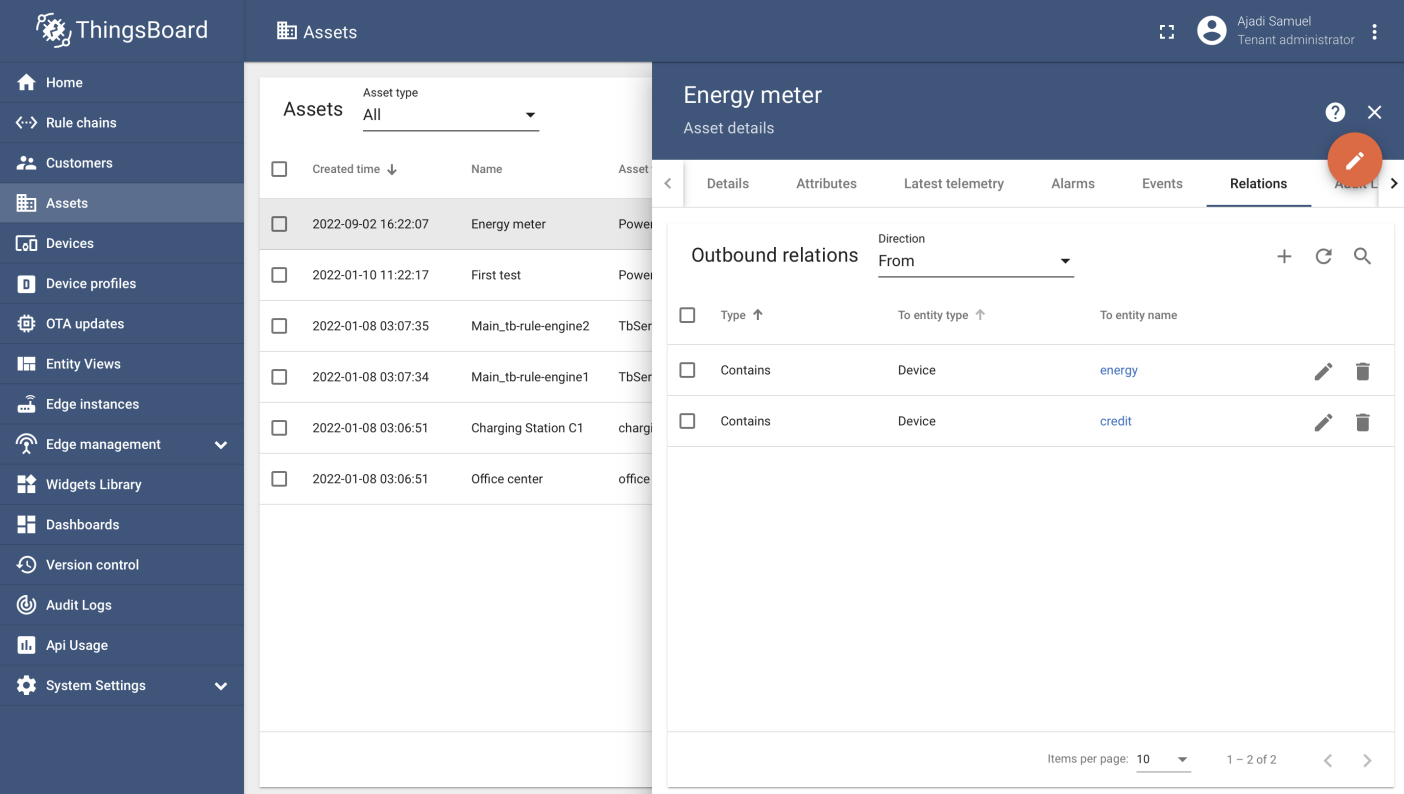
Step 5: Create relations between assets and devices
Developer must create a relation between assets and devices by clicking on the assets button and navigating to the asset previously created in step 3. developer can add relation by navigating to relations and select the entity type as devices then entity name as the name created under devices. If all is done correctly, user should end up with the highlighted page below.
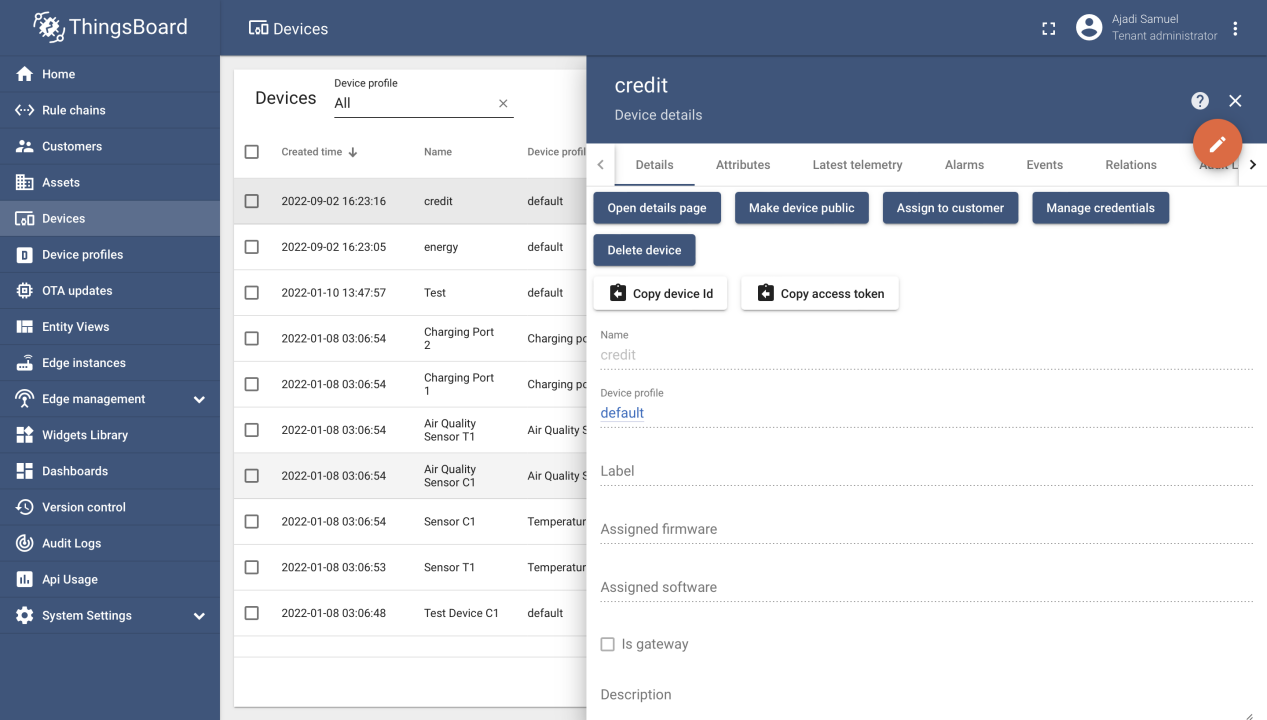
Step 6: Access Token
To enable the meter send parameters to the ThingsBoard API, developer will need to navigate to devices, click on the created devices and copy the access token of each created devices by navigating to the copy access token icon. The two copied token is pasted on the declared variable for TOKEN and TOKEN1 on the firmware code.
The page to copy the access token looks like picture pasted below.
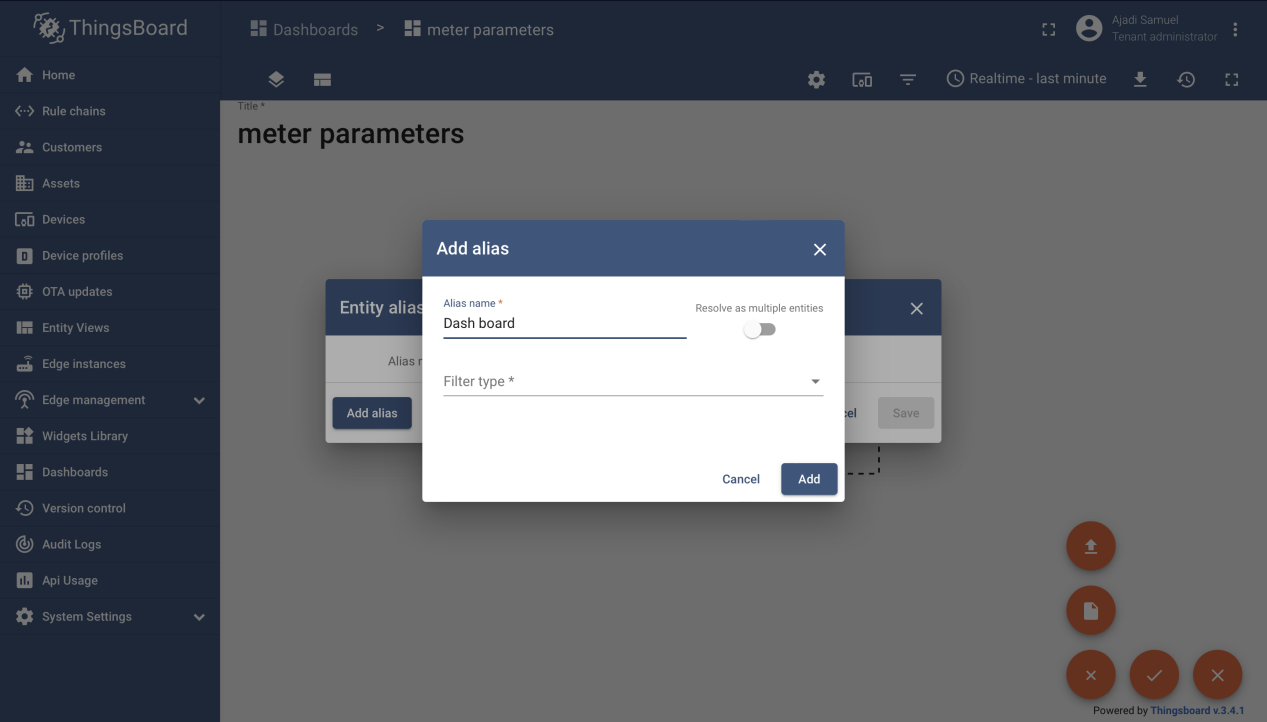
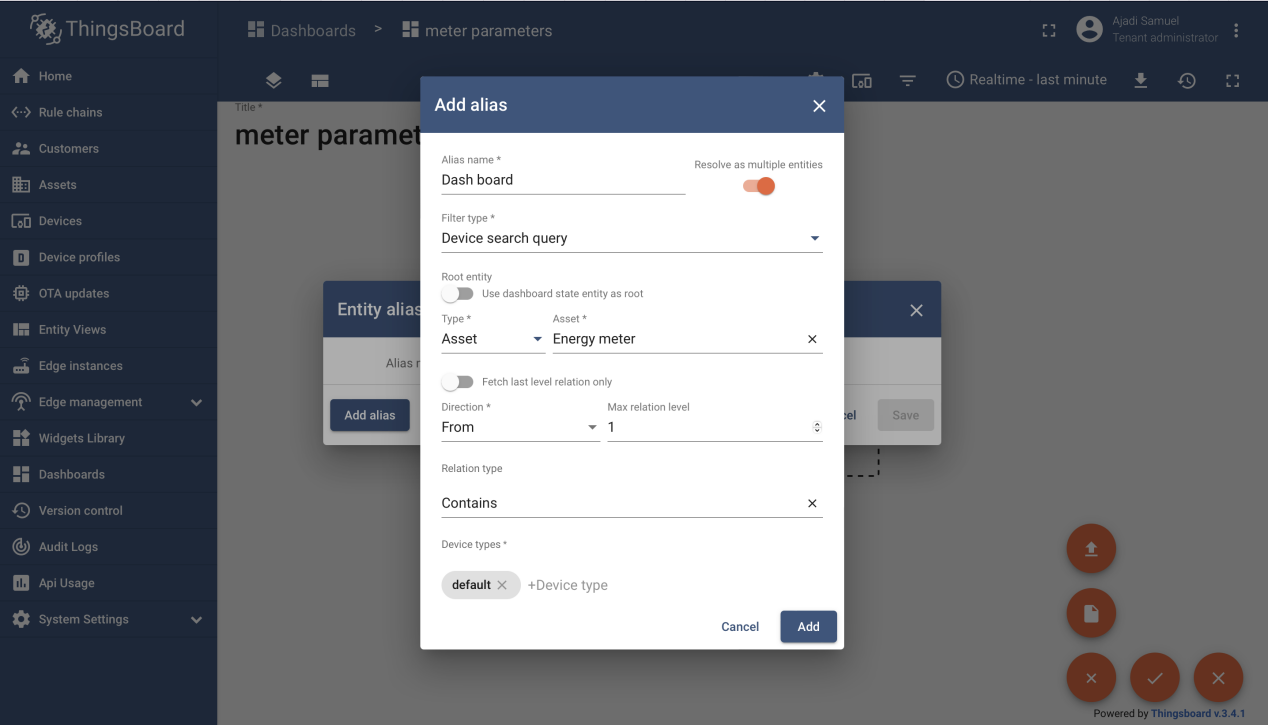
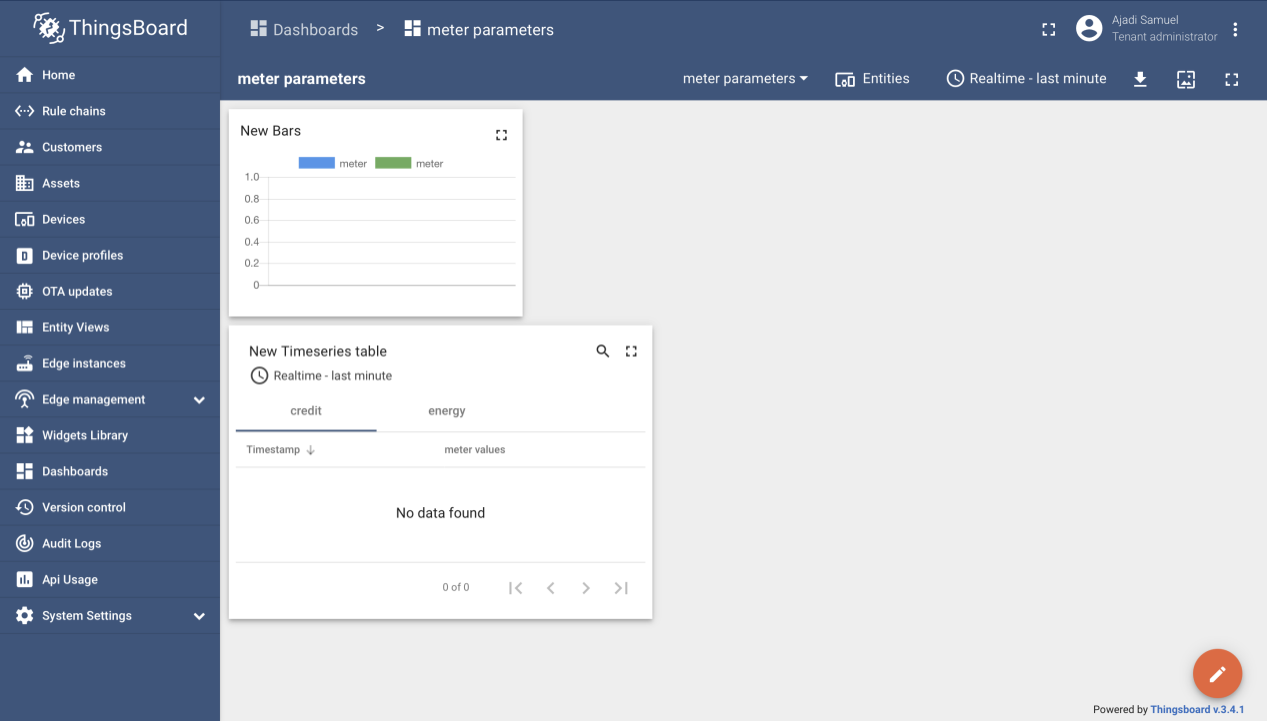
Step 7: Creating Dashboard
Developer is required to create dashboard to visualize sent information from the meter in forms like graph, charts, and lots more as desired by the developer.To create a dashboard to view meter parameters, user will need to navigate and click on the Dashboards icon on theThingsBoard page, click the add icon to create a dashboard and proceed to fill the necessary details shown on the page.
Next developer clicks to add entity aliases and fill the required details. User should end up with the below screen if all is done correctly.
Step 8: Add Widget
Under dashboard, developer will navigate and click on ADD NEW WIDGET, then fill the necessary parameters as created. If all is properly filled, developer should end up with the below screen.
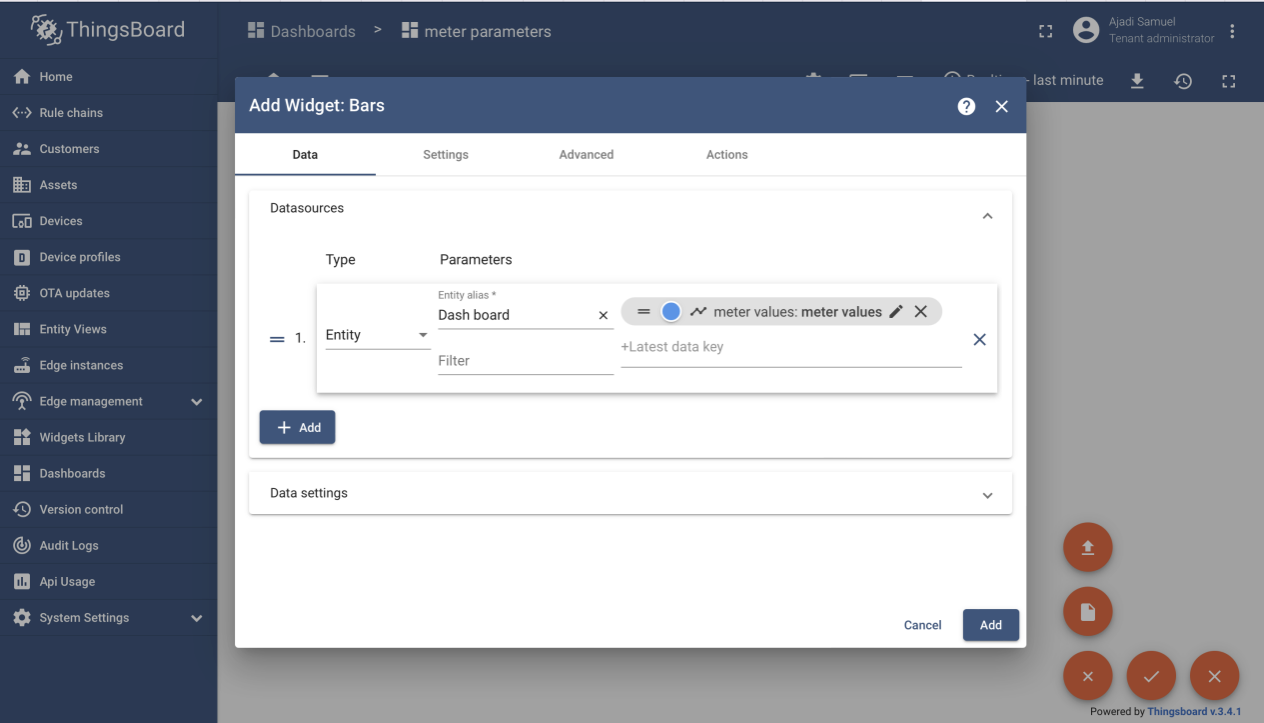
Developer can add different widget as desired.
Paystack Integration
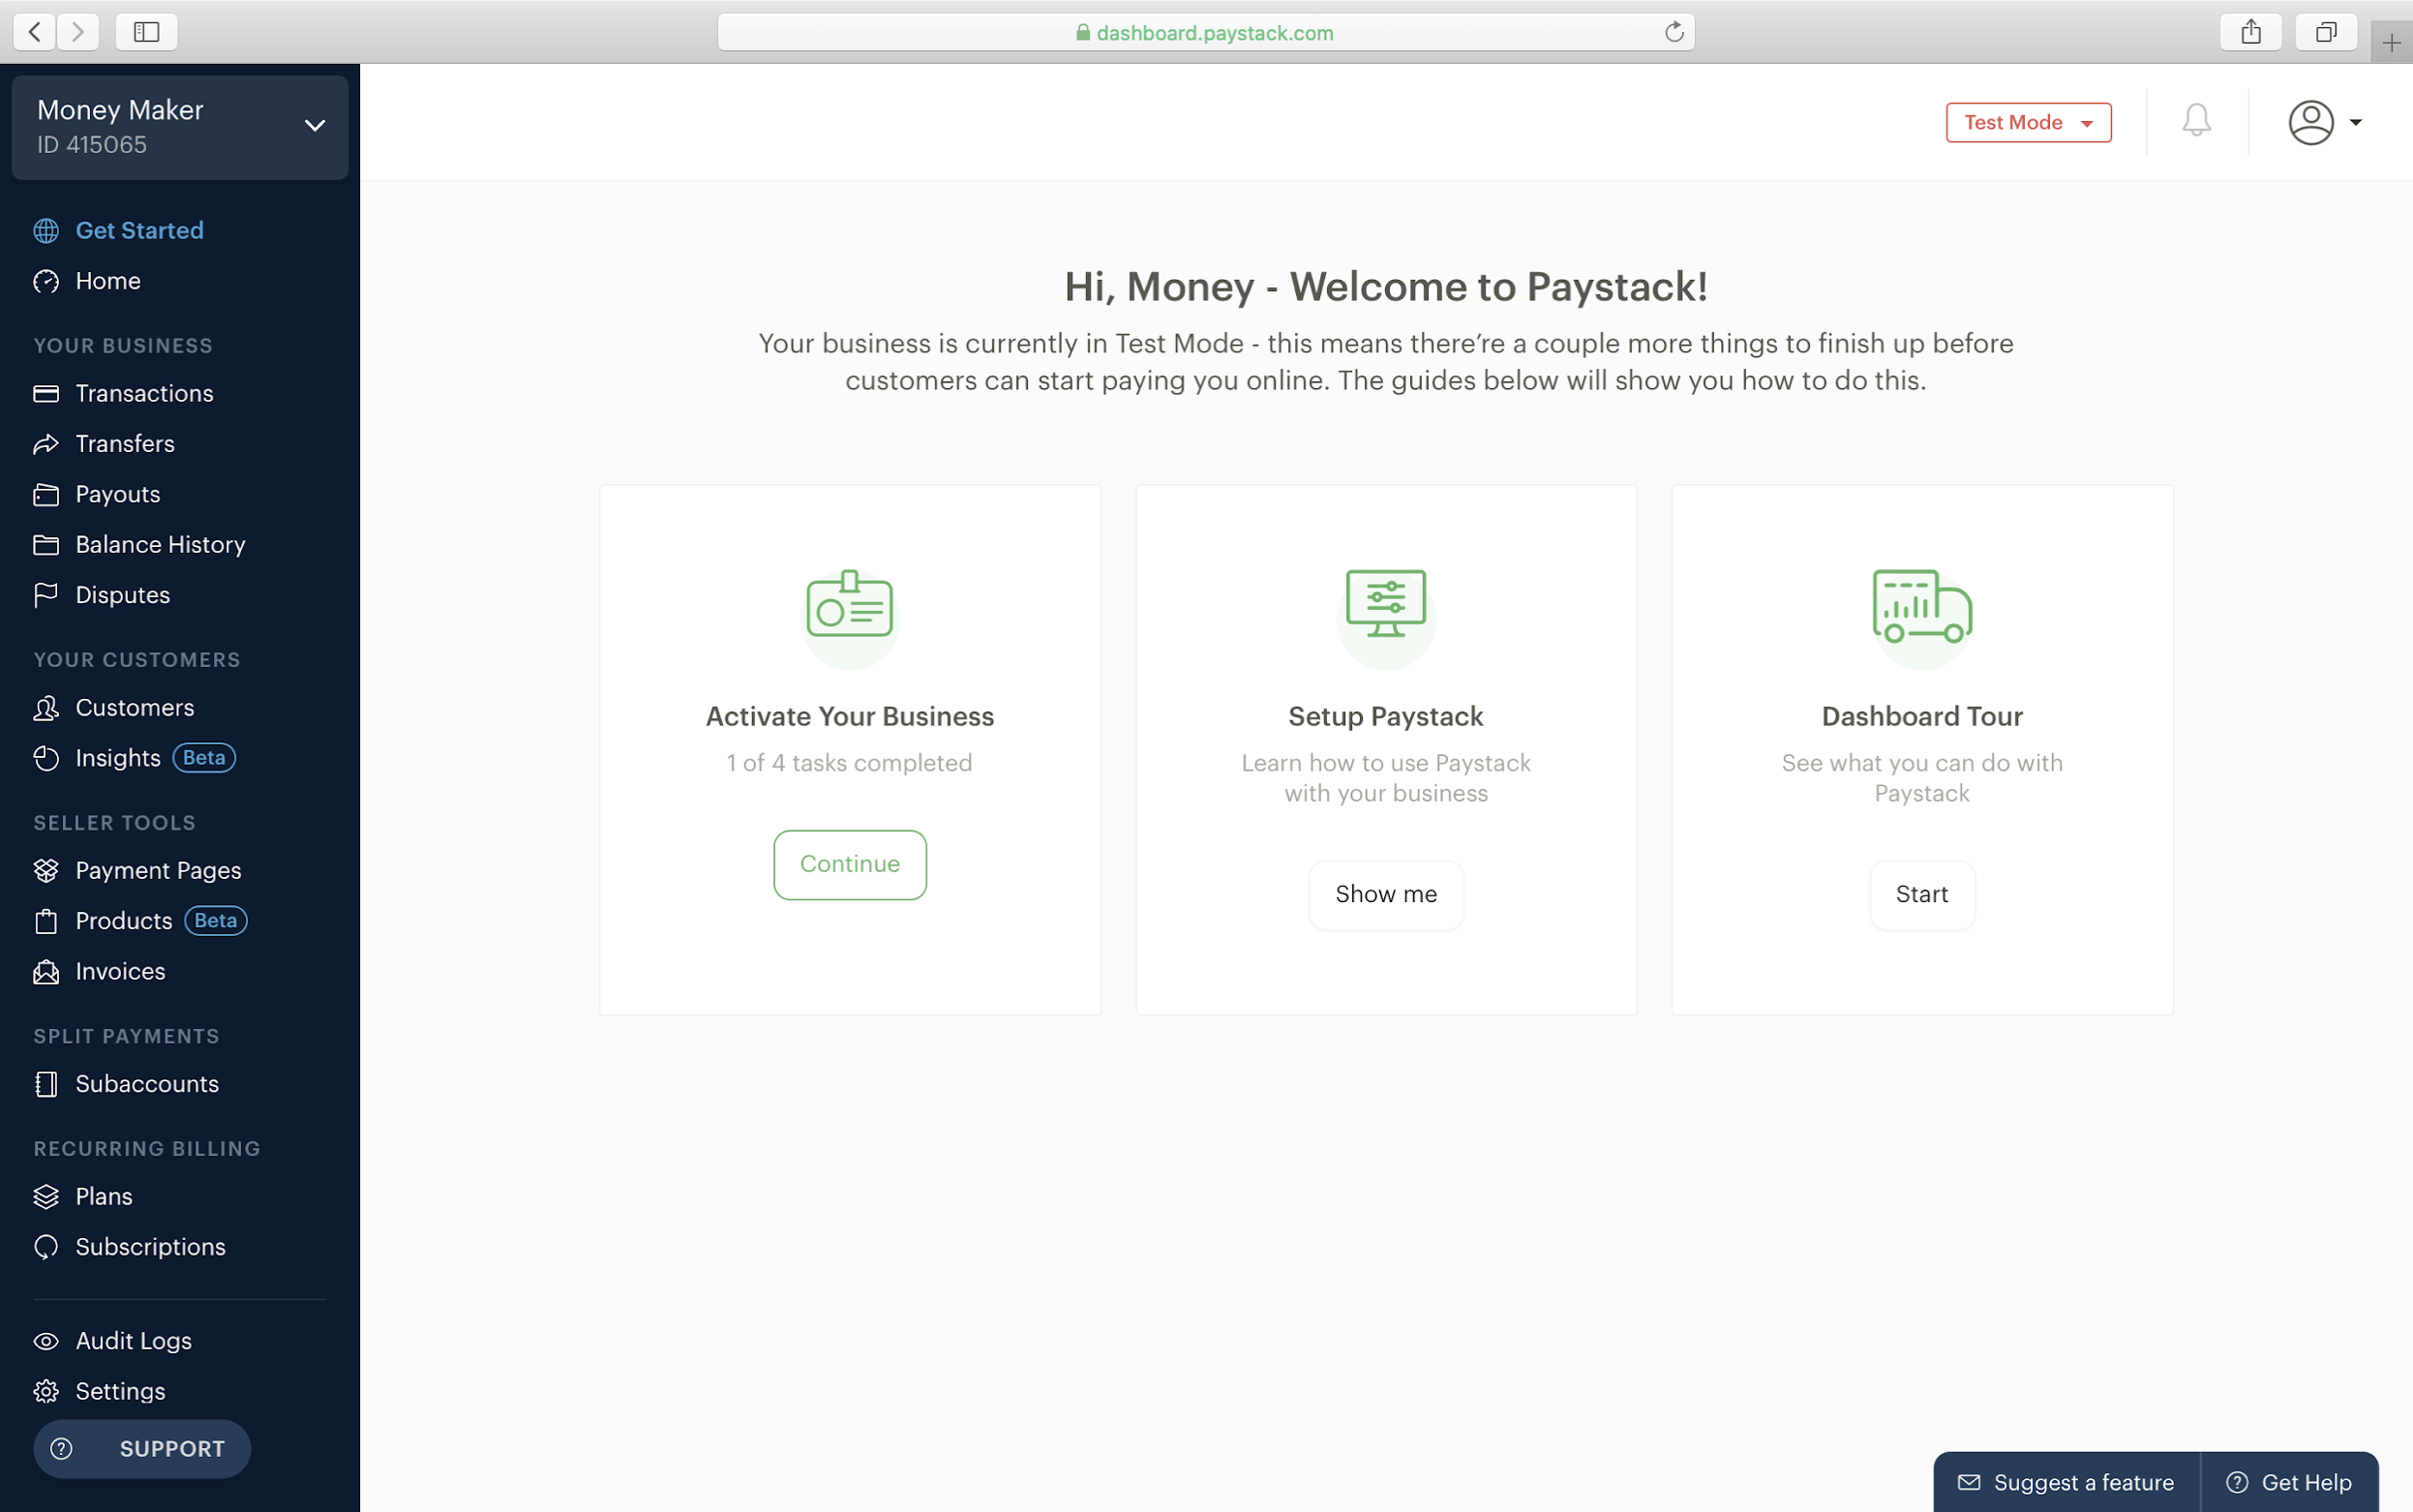
Step 1: Creating a Paystack Account
Developer will begin by creating a Paystack account using https://dashboard.paystack.co/#/signup link to sign up, after the necessary details is filled and user has successfully signed up, the user will be redirected to his/her dashboard. If the account is created successfully, user should end up with the page below.
Step 2: Copy and replace public key
Developer need to login to the Paystack account and navigate to settings, API keys & webhooks, then copy the test public key and put in `initialize.php`` code under the web software. The public key to be replaced looks like the below.
CURLOPT_HTTPHEADER => [
  "authorization: Bearer sk_test_5a679ebeb2769a355091ac05f843d7187b0e7b0e", //replace this with your own test key
  "content-type: application/json",
  "cache-control: no-cache"
],
Once this is done, all transaction done on the webpage will be paid to the developers demo account, the public key and Paystack account setup is a demo version, to receive real payment into live account, developer needs to submit compliance form and go live by navigating to settings, accounts and fill/upload the necessary document to take account live and receive live payments.
Database & Backend
Setting up each meter and assigning meter number
Each meter is setup by firstly creating a database with same name in the file named subscribe.php under the web software folder.
The database servername, dbname, username, password must be edited to same name as used in the database creation.
A sample is shown below.
$servername = "localhost";
$dbname = "id17130795_energymeter";
$username = "id17130795_byker";
$password = "Danielkomolafe00%";
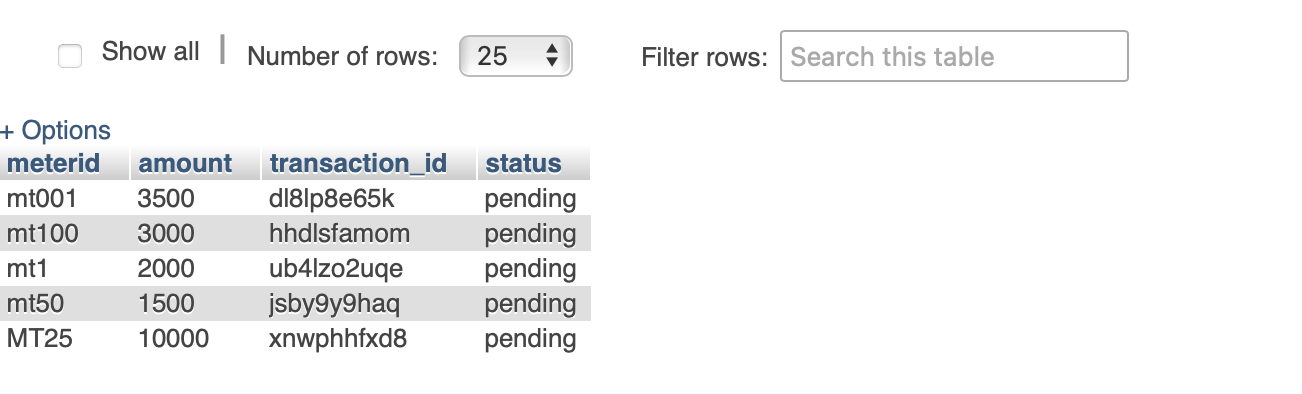
After the database is setup and the developer has changed all necessary parameters in the subscribe.php, the developer will need to create a table named meter with four rows as named below :
- meterid : The meter id row holds the assigned meter number.
- amount : The amount row holds the amount topped up by user.
- transaction_id : The transaction_id row holds the transaction id sent by Paystack.
- status : he status row holds the status of each transaction if successful or failure.
After this is done, the developer can assign meter number to all designed meters by navigating to the database and add desired meter number. Meter number can be from 1 to 99,000. Each meter number can have any prefix as desired by user, sample of different created and assigned meter is shown below in the meterid row.
Setting Tariff
The tariff is set by navigating to the file named subscribe.php under the web software folder, the developer needs to locate the variable named tariff and change the value from 70 to the desired tariff, and automatically the meter will fetch the tariff in the 12th hour as designed in the firmware code.
$tarrif = "70";
STS Token Generation
The STS token generation is automatic once the developer assign a meter number between 1 and 99000, the meter number assigning can have any prefix as desired by developer, though in the sample code created, the prefix is set to be any two letters, if developers change the prefix before the meter number, user has to change the code below from 2 to the new number of suffix. The code is available in check.php inside the web software folder.
$mt_no = substr($MT,2, 10); //to extract the digit out of the meter code number
Once the meter number is properly assigned and setup, the meter number is automatically generated.
Private key
To further encrypt the STS token generation algorithm, a private key was used to bind the token with the firmware code. The private key can be a value between 100 and 111 and is changeable under check.php in the web software folder, the image of the line to be changed is shown below.
$privatekey = 109; // can be a number between 100 and 111
Note: the private key used on the web code must be same as the private key used in the firmware code.
API encryption
The web platform is encrypted such that a meter can send or receive information from a webpage expect the API key used on the web page is same as the API key used on the firmware. The API key is changeable as desired in the subscribe.php under web software. The image is shown below.
$api_key_value = "tPmAT5Ab3j7F9";
Function of each folder in the web API
All folders in the web interface is named below:
- Assets.
- Css.
- Img.
- Callback.php.
- Check.html.
- Check.php.
- Connectionstatus.html.
- Connectionstatus.php.
- Exist.php.
- Index.html.
- Initialize.php.
- Stspending.html.
- Subcribe.php.
- Topup_check.html.
- Topup.html.
Assets: Assets hold other files for the front end of the webpage such as the javassript file, css file and others.
CSS: All CSS file is used to style the html web page.
Img: The img folder is used to hold images used in the html web page.
Callback.php: The callback.php is used to fetch and process filled information from Paystack while user was trying to top-up, it fetches information such as meter number and amount. The php code also insert the fetched meter number, top up, transaction id, transaction status information to the required row in the database.
Check.html: The html document creates an interface for user to fill meter number and search the database to know if the meter exists.
Check.php: The check.php code processes the meter number submitted and scan the database to check the top-up status of the filled meter. The php code also handles the STS token generation.
Connectionstatus.html: The html document creates an interface for user to fill meter number alongside a button to check meter connectivity status, the status can either be online or offline.
Connectionstatus.php: The connection.php code processes the meter number submitted and try to establish a connection with the meter within a few secs, then return the result of the established connection to the user to tell if the meter is online or not.
Exist.php: The exist.php code processes the meter number submitted and scan the database to check if it exists or not and updates the user on the search status.
Index.html: The index.html page is the landing page of the web platform.
Initialize.php: The initialize.php code is where developer insert Paystack authorization token, and process everything as related to using Paystack API for meter topup.
Stspending.html: The html page creates interface and button for user to insert meter number for STS token generation in event where topup is taking time to top the user meter up.
Subcribe.php: The subscribe.php receives incoming request from individual meter and fetch tariff, topup status, topup amount if available and pass to the meter.
Topup_check.html: The topup_check,html creates interface to insert meter number in other to check if meter number exist before trying to topup the meter.
Topup.html: The topup,html creates interface to insert meter number, amount, user email address for meter topup purpose.